A typical timeline for a timber frame self-build
There are a number of approaches to undertaking your self-build, which will depend on how much of the project you can take on yourself. The tips below assume you are taking on the scheduling of the project yourself and managing sub-contractors. If you are working with a main contractor, or kit supplier such as Scotframe, they will take on some, or all, of these elements for you. It’s important to know the scope and your responsibilities from the early stages.
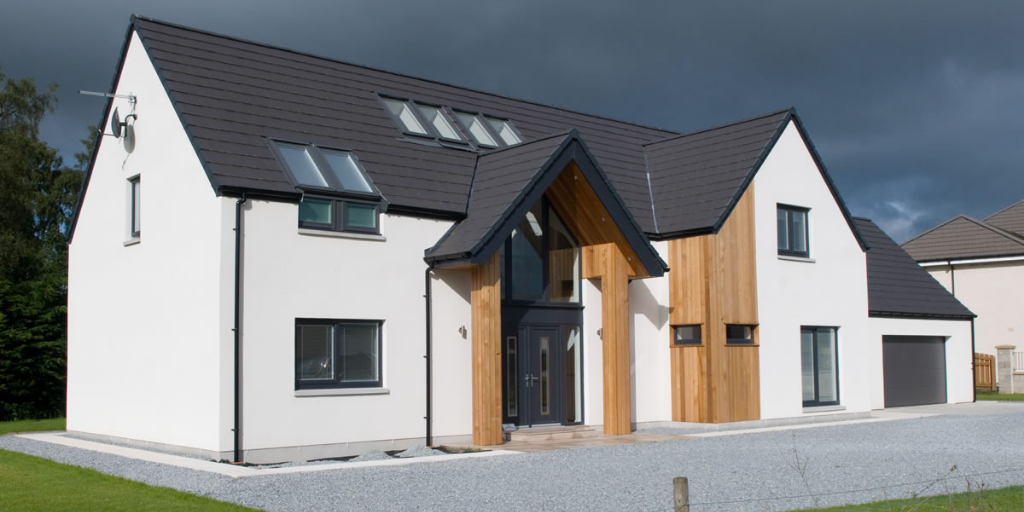
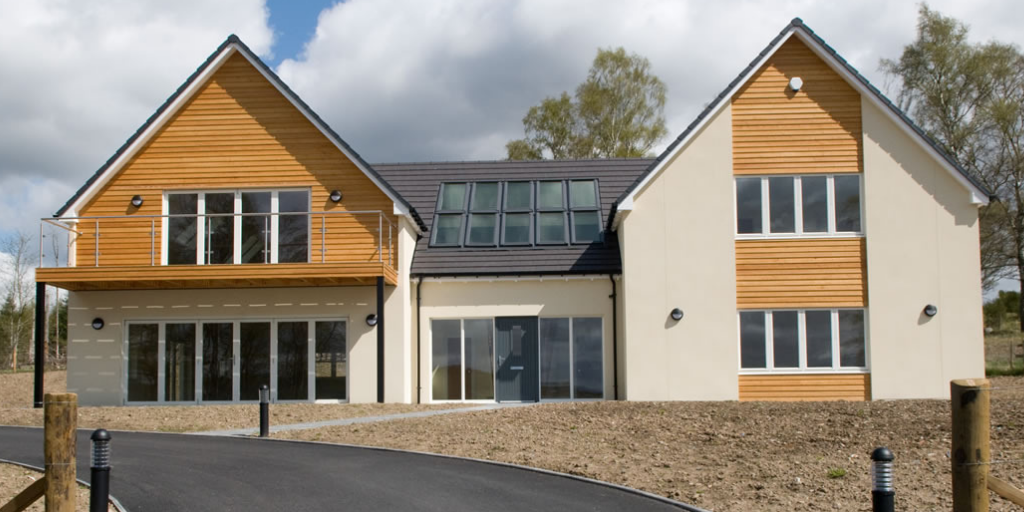
Timber frame construction is becoming a popular choice for self-builders as it can deliver a number of long and short term benefits. A well installed timber frame build has a number of advantages – it’s based upon a sustainable material, it’s economic to build, thermally efficient and the nature of its construction and the use of factory prefabrication – means that it can be erected quickly.

According to timber frame supplier Scotframe, creating a timber frame house saves around 30% of build time for a two-story house and, in some cases, the structure of your home can be erected and watertight in five days, ready for the external cladding to be completed.
Compared to a traditional build, a well-constructed timber frame build can provide superior thermal efficiency, meaning that the building remains warmer in the winter and cool in the summer. It can also provide greater accuracy on site, while maintaining design flexibility.
If everything goes to plan, ideally your timber frame self-build could be completed between 8-12 months.
However, bear in mind that the precise design for a timber frame must be finalised in advance of manufacture to ensure efficient delivery. An allowance of factory-time (8-12 weeks’ dependent on complexity and time of year) needs to be included in your schedule.
With so many choices in a self-build home - one of the real benefits of a timber frame house kit is that the whole process can be much more hassle-free. For example, Scotframe provide a wide range of different designs to suit budgets, tastes and space requirements as well as a range of bespoke design and architecture services to help create exactly what you need.
Scotframe provides timber kit packages, which come in open panel timber frames or closed panel systems. Open panel timber frames are manufactured with the internal side of the walling element unsheathed. Closed panel timber frame systems have insulation pre-fitted and in some cases the doors, windows and plasterboard are already in place. Many self-builders opt for a closed system, which are faster to erect and can achieve excellent airtightness levels.
If everything goes to plan, ideally your timber frame self-build could be completed between 8-12 months.
So, you’ve designed, financed and secured planning permission. Now it’s time to get stuck in and begin constructing your timber frame self-build.
Creating a timber frame house saves around 30% of build time for a two-story house and, in some cases, the structure of your home can be erected and watertight in five days
A timber frame timeline
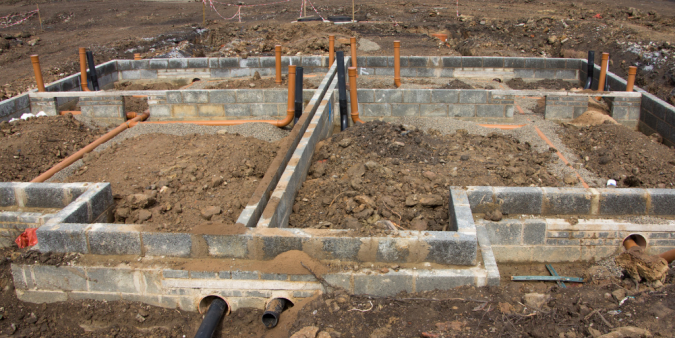
1/ Laying the foundations for your timber frame : around 2-4 weeks
While your timber frame house kit is being manufactured, now is the time to crack on with your foundations. Ideally schedule in two weeks for the laying of foundations but bear in mind that this stage varies depending on the plot you’re dealing with.
During planning, your building control officer will advise you on any unusual complications such as nearby tree roots or shrinkable soils.
For most projects, the starting point would be with the trench fill technique. This method will only work with stable ground, such as clay and chalk soils, as the sides of the trench are vital to support the build. Trench fill foundations also avoid the need for bricklaying below ground, saving you time and money.
If you are working on an unusual plot shape or are planning to build on less stable ground, strip foundations may be the better option. This is commonly used as a timber frame foundation. A level strip of concrete is used as the base for the construction.
This method spreads the load of the build over a greater area, providing stability to a more complicated plot.
2/ Frame assembly: around 3-4 weeks
A timber frame structure will feature walls made of timber studwork fixed in place with OSB or plywood. The board supplies the racking strength when it is nailed to the studwork. Once insulation is installed the panel becomes ‘closed’. Timber frame kits may be supplied open or closed, dependent on the project. The beauty of choosing a closed panel means that your timber frame kit is delivered to site with the insulation already installed. Dependent on the chosen solution, the external cladding, doors and windows may also be fixed.
Once your timber frame kit is ready, it’s a fairly swift process to erect the pre-manufactured frame. This can be completed in a few days, but to allow for more complex installations and potential delays for inclement weather, it is wise to include two to four weeks in the initial programme from arrival onsite to the point when the structure is protected from the elements - fully wind and water-tight. Manufactured timber frame kits often come supplied with the roof trusses and these are normally assembled once the whole frame has been constructed. If the project has a room-in-the-roof design, then cassette roofs may form part of the installation.
Do bear in mind that no building is fully protected against the weather until the final external cladding and roof is on and sealed. So once your timber framed home is weather tight, final roof and wall cladding comes next. It’s time to call in your bricklayer, joiner or renderer. For this kind of home, the external cladding may not be part of the thermal installation, giving a wide choice of external claddings, including brick, render or timber finishes. Lightweight proprietary cladding systems are proving increasingly popular.
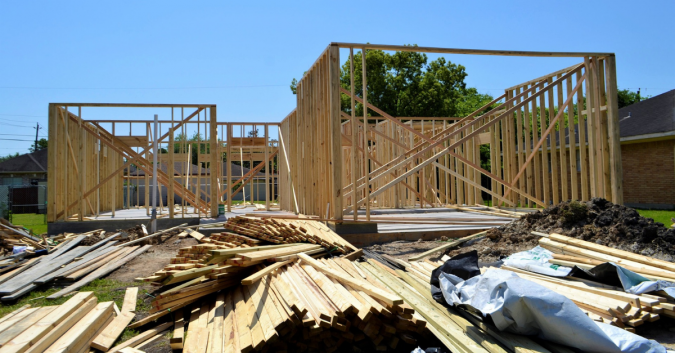
Open panels are manufactured ready to fit your doors and windows. You’ll need to consider whether you’d like to use triple glazing, for example, which improves the thermal efficiency of a building compared to double glazing. Triple glazing ensures more heat is retained, and it also improves the property’s acoustic performance, reducing noise from outside of the home, and it reduces the risk of condensation. The type of windows you choose will be dependent on your own needs at home, your taste and your budget.
3/ First Fix: around 3-4 months
Once the structure is watertight, you’ll need to organise tradespeople to commence on the electrics, gas, and plumbing. This can be undertaken while the external cladding is installed, saving time on the project, so this is where trustworthy tradespeople can save you a lot of time. Generally, the first fix will include the installation of electrical wiring, pipework for water and gas, and any air-conditioning (HVAC) distribution you may need. Where possible, you should aim to check all the work related to the first fix before any further work begins.
Once the first fix is completed, it is time to fix your plasterboard studwork, ceilings, partitions, wall linings and floors. The walls of timber frame, steel frame and SIPs (structural insulated panels) houses are almost always finished with plasterboard such as Gyproc fixed to the vertical studs. Please note, it is not recommended that plasterboard is installed or plastered until the building is fully watertight, as it can be damaged by leaks.
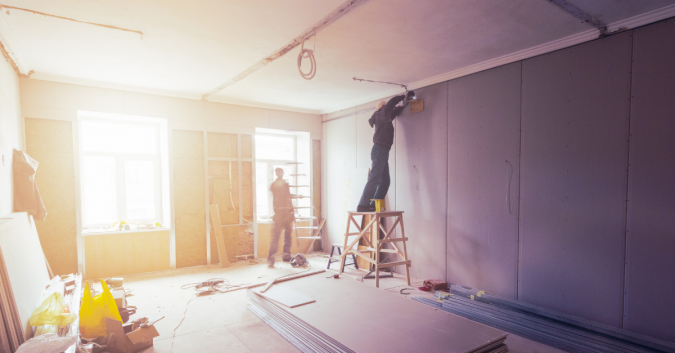
This phase also involves a carpenter and the construction of a variety of structures such as skirting, timber flooring, staircases and integrated storage. Unless you have previous experience in carpentry or related self-building, it is recommended to contact a professional carpenter before you reach this stage. Once the wall finishes are in place, it’s on to the second fix.
Download the Scotframe Self Build Guide for more detail on the first and second fix.
4/ Second fix: a few weeks
This stage is where your house starts to begin looking like a home, as you’re installing all the items that are fixed to the walls or floor. Your electrician will return to install items such as sockets, light fixtures and security alarms. Your bathroom and kitchen can also be fitted, with a plumber (or yourself) installing and connecting the fixtures and fittings.
This is the time for decorating: applying paint, wallpaper and floor coverings. It depends on the size of your home and workforce, but this stage should only take a few weeks at least, but you might realise that you need to buy more items to really feel ‘at home’.
5/ Testing services: around one week
Airtightness and acoustic testing are two important factors that need to be completed. If you’re in need of some help, Build Aviator is a great service to take some of the pressure off your build. If you work with a full kit supplier such as Scotframe, these services may be included in your package. Dependent on the number of tests that need to be completed, this stage shouldn’t take any longer than a week. However, a home of Passivhaus standard, for instance, will require testing and certification which may prolong this process.
6/ Snagging: a few weeks
The final stage has arrived and this is where you are checking for any faults or defects with the fit and finish of your build which may require some repair work. If you are working with contractors or tradespeople, surveying the whole house and making a list of any relevant ‘snags’ is the best way forward, as you can then complete the repairs yourself in an orderly fashion and pass the list onto your builder if needed. The snagging stage could either be quick or slow, it depends on the quality of the fit and finish so far. But this final part of your build is just as important as any other stage - especially if you notice any faults that could cause a health and safety or comfort issue later.
7/ Exterior decorating: a few weeks
Typically, this is the last big job to finish in making your home look beautiful from the outside. You may need a landscape gardener or just an extra pair of hands for certain decorations and this stage could take a week through to a few months depending on what you hope to achieve. You may have already moved on to the next stage before this is completed.
8/ Completion
It’s time to move in! When your build is complete, you will need to arrange for a final inspection from the warranty inspector and building control to get a warranty and Completion Certificate issued. You’ll also need to advise your local authority of completion to arrange a council tax evaluation, and prepare an Energy Performance Certificate to send to building control. Finally, don’t forget to change your insurance to a homeowner’s policy to protect your finished home.
(Be aware that different regulations apply for England and Scotland.)