A typical timeline for a traditional build
Writing up a vague timeline for your build is great to understand how much time it is going to take, and should also help you to increase your work efficiency. So to give you a kick-start, we have created a template of a typical timeline for a traditional self-build. The following timeline is applicable to most builds but some stages may vary.
Clear and peg site
This is the time to sort out any anomalies related to the plot and the plan before you start any digging. Clearing the site, taking measurements, and applying pegs are essential to double-check the original plans. The local planning authority will be on your case to make sure the measurements match the approved plans. If your build begins construction and is not exactly where it is supposed to be, this can be a costly fee and discussion with the planning authority.
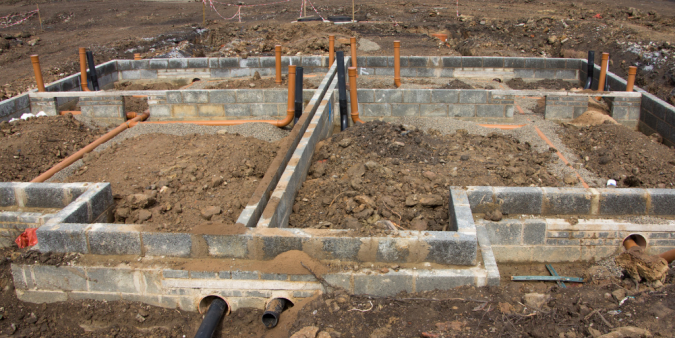
Foundations
This stage can vary in the amount of time to complete depending on the plot you’re dealing with and what technique you are using. The majority of self-builders will start with the trench fill technique. This method will only work with stable ground, such as clay and chalk soils, as the sides of the trench are vital to support the build. Trench fill foundations also avoid the need for bricklaying below ground, saving you time and money.
Otherwise, if you have an unusual plot shape or are planning to build on less stable ground, strip foundations may be the better option. This method spreads the load of the build over a greater area, providing stability to a more complicated plot. A sloping site, for example, can benefit from stepping the foundation to maintain the level. Your building control officer will advise you on any unusual complications such as nearby tree roots or shrinkable soils.
Floor structure
The type of floor structure to go with is generally dependant on the final floor finish you have in mind, as each structure has varied benefits. But in general, the floor structure can take a few weeks to be completed. There are two main structures which the majority of self-builders will choose from;
Solid slab/concrete ground floor
This method is very labour intensive and may be more suited to smaller builds or extensions, however it balances out as a very cost-effective option. Layers of hardcore infill, sand blinding, a damp proof membrane, and at least 100mm of concrete are what create this type of flooring. If you can assemble some helping hands, you’ll be able to save a lot of money as the materials are cheap to buy.
Beam and block flooring
Suspended flooring systems are the more expensive option, however the beam and block flooring can be installed very quickly. If you are planning to build on a sloping site, the suspended flooring is your best option. Even though the cost of materials is high, nearly all self-builds now use this type of floor structure due to its convenience.
Superstructure
The broadest definition of the superstructure includes all works above ground level. This is debatable but gives you an idea of the scale of this stage. For brick and block construction, bricklayers and ground workers will be the main workforce behind the erection of this structure which could be the lengthiest stage of your build. For a timber frame or whole-house kit, major parts of the structure are manufactured offsite meaning the frame and panels can be erected in a matter of days.

Roof
A roof is not only there to be aesthetically pleasing, but to protect you from the elements. Construction starts with installing the roof trusses and a layer of deck protection such as roofing felt to function as a protective layer. Any high-risk areas need to have a leak barrier, and once these are installed, the tiles/slate can be applied. With a team of professionals at work, a roof could be installed within one to two weeks but this dependant on the design and materials being used. To save on time, a panelised roofing system can be used which is manufactured off site, giving cost certainty and reduced waste. Depending on what you plan to use your roof space for, there are a variety of roof trusses to choose from. Attic trusses allow you to extend your living space with a room-in-the-roof or raised tie trusses provide a higher ceiling. Read more in our guide to roof trusses.

Put windows in
Windows provide ventilation, insulation, and natural light, all of which are essential factors of an efficient build and a home that improves occupant health and wellbeing. At the design stage of your build, considering the building’s orientation in relation to the sunrise and sunset means windows can provide natural heat and light to specific rooms of the house throughout the day. You will also need to consider the size of the windows [as this is essential to manage the heat gained from the sun] and the quality of your glazing. Triple glazing improves the thermal efficiency of a building compared to double glazing as more heat is retained, and it also improves the properties’ acoustic performance, reducing noise from outside of the home, and it reduces the risk of condensation. The type of windows you choose will be dependent on your own needs at home and your own taste.
Once the roof, windows and doors have been installed and any gaps have been sealed, the build should be watertight.
First Fix
Once your build is watertight, work can commence on the electrics, gas, and plumbing. This phase can take a good few weeks as you will be relying on professional traders, but this is where trustworthy tradesmen can save you a lot of time. Generally, the first fix will include the installation of electrical wiring, pipework for water and gas, and any air-conditioning (HVAC) distribution you may need. Where possible, you should aim to check all the work related to the first fix before any further work begins.

Plumbing, Electrics & Carpentry
Continuing from the first fix, external plumbing and electrical work can begin after the first fix has been checked over. Things like gutters, wastewater system, and any electrical inputs or outputs that might need some attention. This phase also involves a carpenter, whereby they can begin transforming your house into a home. This can include a variety of structures such as skirting, timber flooring, staircases, integrated storage, and many more. Unless you have previous experience in carpentry or related self-building, it is recommended to contact a professional carpenter for this stage.
Plastering
Finding a plasterer can be a time-consuming process due to their demand, and it is best to organise a contact as early as possible to make sure you’re not wasting valuable build time. The walls and ceilings both require layers of plaster, and some floorings too but not all. Drylining plaster has become a very popular method and will save you time in comparison to wet plaster. A realistic time estimate could be one day per room, but this is dependent on the size of the rooms, type of plaster, and efficiency of the plastering.

Second fix
This stage is where your house starts to begin looking like a home, installing all the items that are fixed to the walls or floor. Any electrical items such as sockets, light fixtures, security alarms, and TV satellites may require an expert, but otherwise, you can continue with the fixtures by yourself. Dependant on the size of your home and workforce, this stage should only take a few days, but you might realise that you need to buy more items to really feel ‘at home’.
Interior designs
The ‘at home’ feeling starts to flourish now because you can use your artistic flair and creative eye to customise your house into your dream home. This stage can take as long as you want it to as you are adding the final touches to your home, which may never end.
Testing services
Airtightness and acoustic testing are two important factors that need to be tested for, and if you’re in need of some help, Build Aviator is a great service to take some of the pressure off your build. Dependant on the number of tests that need to be completed, this stage shouldn’t take any longer than a week. However, a home of Passivhaus standard, for instance, will require testing and certification which may prolong this process.

Exterior decorating
Anything from garden gazebos to outside wall hangings, this stage is the final creative step to make your home look beautiful from the outside, as well as on the inside. You may need a landscape gardener or just an extra pair of hands for certain decorations but this stage should only take a few days.
Snagging
The final stage has arrived and this is where you are checking for any faults or defects with the fit and finish of your build which may require some repair work. Surveying the whole house and making a list of any relevant ‘snags’ is the best way forward, as you can then repair in an orderly fashion and pass the list onto a builder if needed. Dependant on the quality of the fit and finish so far, the snagging stage could either be quick or slow, but it is just as important as any other stage of the build. Especially if you notice any faults that could cause a health and safety issue.

Completion
When your build is complete, you will need to arrange for a final inspection from the warranty inspector and building control to get a warranty and Completion Certificate issued. You’ll also need to advise your local authority of completion to arrange a council tax evaluation, and prepare an Energy Performance Certificate to send to building control. Finally, don’t forget to change your insurance to a homeowner’s policy to protect your finished home.